Make Your Own Custom Welder’s Extension Cord, DIY Style
Last year I moved back to Arizona for work and rented a house for a year. Since I was living in a rental and did not own the home, I was not ‘allowed’ to install 220v outlets in the garage for the welder and plasma cutter. My only option was to install an RV outlet below the breaker panel and make my own extension cord that would reach to the garage as a temporary solution.
Thanks to the guys at the Home Depot, I learned a couple things.
1. Home Depot does not sell 220v welding outlets. Even if you search www.homedepot.com you will most likely not find an outlet for your 220v welder.
2. Based on the Welding Supply store hours only being open while I’m at work, I was forced to purchase an RV outlet with a weatherproof box at Home Depot.
To go with the outlet box, I had to get some flex tubing to extend the power to it, but only 18″ or so.
3. Extension cords typically can be purchased anywhere with a selection of sizes ranging between 12-16 gauge, with the lower number being the largest diameter wire they sell in a ready made extension cord.
Here is a 16 gauge cable, it is very thin and mostly used for lawn equipment or other outdoor 110v applications.
Notice the price above for 100 ft of cord is about $17 while the larger diameter cable below is only 25 ft and costs about $24. The 12 gauge cord is much thicker and better to extend the reach of a 110v welder to minimize the loss of power. This will greatly improve the arc while welding when compared to a smaller gauge cord.
Now, it is not normal to find 10 gauge at the store; however, you can usually find a small selection on one of the home improvement store websites.
Getting to my point, I have a 110v/220v Miller 211 welder and needed to figure out a solution to get power to my garage from the breaker box, which was located on the opposite side of the house. I measured from the breaker box the the far corner of my garage, and it was about 60 feet. So I’m feeling pretty prepared when I go down to Home Depot to get make my own cord and the guy tells me that 10 Gauge would be fine for my welder if I was only needing like 10 feet of cord, but for 60 feet, he said i would have to go with 8 gauge. If you’ve ever seen 8/3 cord it is as large as a garden water-hose!
Ok, moving on, the guy at Home Depot was generous and cut me 65 feet of cord, while only charging me for 60. I thought that was great customer service because the $170 or so I paid for just the cord was about $70 more than I planned to pay for the entire project. I didn’t stop there, I still had to get the RV plug that would fit into the RV weather box I purchased above.
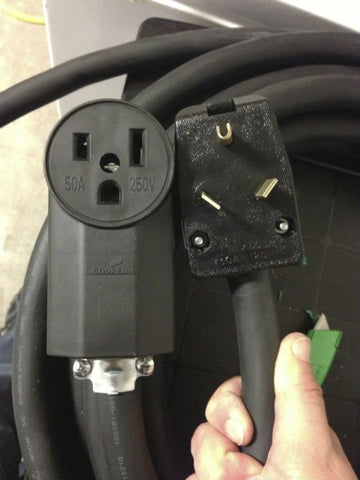
Finally, I needed to purchase an outlet that would accept the 220v Miller Welder’s plug, see it below from Amazon.
Once I had the 3 parts for the cord (RV Plug, 65 ft of cord, and Welder Outlet), the assembly was pretty simple and it came together with little effort. I used some wire cutters, wire strippers, a blade, and a screw driver to put it together.
I had a friend who knew more about electrical boxes come help me to make sure I didn’t electrocute myself. If you need to make a custom extension cord for your welder, keep in mind a simple rule. The longer you are from your power supply, the thicker the diameter of wire you should purchase. For more help with selecting the right gauge wire to use for your welder’s extension cord, the guys who work in the electrical section at your local home improvement store should be able to help.
- I made a 65 ft custom length extension cord for my 220v Miller 211 welder.
I hope this has been beneficial to understand what is needed to make a custom extension cord for your 220v welder. Please offer any comments below. Also, if you have followed us on Facebook yet, that is where most of the updates have been happening lately, click here to like our page. www.facebook.com/diyweldingplans
Happy welding!
Kelly
Comments
Leave a comment